
Piñatas can be a lot of fun. I had them at birthday parties growing up, I’ve made them for my child, and I’ve also made uterus piñatas for baby showers three times now. What could be more ridiculous for a baby shower than a pink, frilly, paper maché uterus full of candy, and whacking it with a stick? Actually, I think we should start a whole new custom of first menstruation piñatas filled with red licorice! Maybe by the time I’m an old lady, this will happen!
If you’re as tacky as I am, or your friends are, here’s how to make a fantastic piñata shaped like a uterus, fallopian tubes, and ovaries. You need to make the paper mache at least 3 days before the event so that it has time to dry.
Materials:
– A large balloon
– A newspaper
– Flour (2 cups)
– Water
– A large bowl (to mix the flour and water)
– A small bowl (on which to perch the balloon)
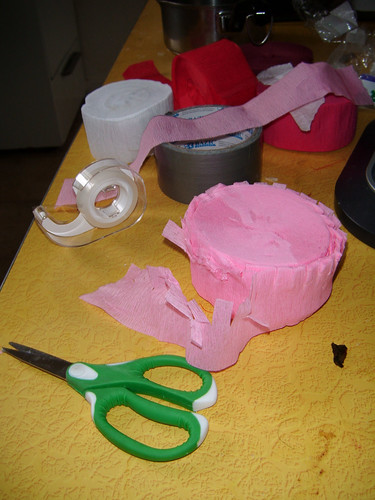
– Crepe paper (shades of pink, red, and white)
– Two empty paper towel roll tubes
– Duct tape
– Clear tape (i.e. scotch tape)
– Strong string, twine, or rope
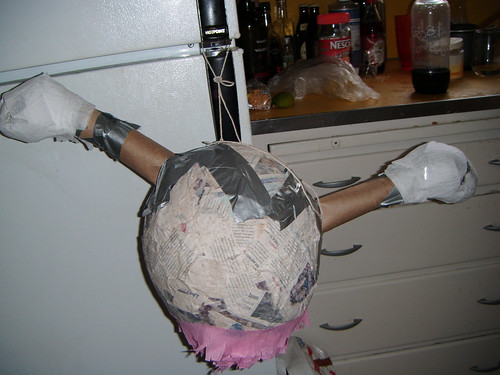
Mix the flour and water in the large bowl to make a thin paste. Tear the newspaper into strips about an inch and a half wide and 6-8 inches long. Perch the balloon on top of a small bowl, to keep it still. The wide part of the balloon, obviously, is the top of the uterus! Dip a piece of newspaper into the flour paste, holding the top of it carefully so it doesn’t tear. Use two fingers to gently strip the extra paste off the strip of paper, and plaster it onto the balloon. Do this in a criss cross pattern till you cover the whole balloon. You may want to cut a loop of string and paper-mache it on to the top so that you have a place to tie up the piñata! Set it aside to dry for a few days.
When it’s dry, cut a small hole in the top with a knife. The balloon will pop. The hole is for you to put in the candy or other piñata fillings later!
Now you need to make your festive fallopian tubes. Cut some slits in one end of the paper towel roll tubes and bend them back. Use duct tape to tape those bent-back ends onto the sides of the uterus, near the top. For the ovaries, wadded up newspaper taped into an egg shape works fine, but you could also use hollow easter egg shapes. Use lots of tape to make it firm! It’s all getting covered in crepe paper.
Now take the rolls of crepe paper. Stick scissors into the edge of a roll, a few layers deep, and cut fringe all the way around.
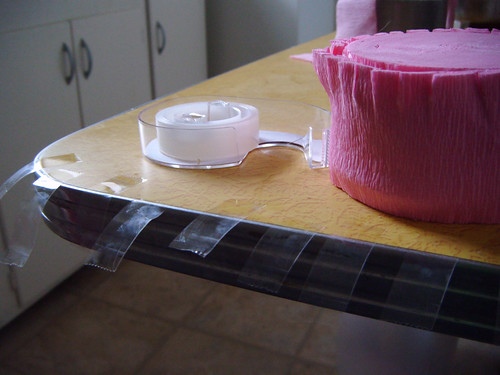
Lay out a lot of strips of tape on the edge of a table.
At this point you should hang up your piñata somewhere to work on it!
Now start taping the fringed crepe paper onto the paper mache balloon. Start near the bottom of the uterus. For the bottom rows, you’ll need to pleat it and tape it quite often as you wind the strip of paper around the narrow end of the balloon. It’s worth using a lot of tape to anchor the paper firmly!

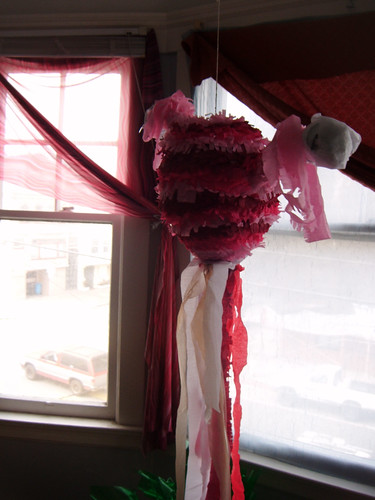
As you finish each row, gently curl the fringe upwards with your fingers. Then keep winding the crepe paper around the balloon as you work upwards. The tighter you make the layers overlap, the nicer the piñata will look. Alternate shades of pink and red for a more interesting and decorative uterus!
Up near the top you will need to use more tape and fold or pleat the paper a lot.

Then wrap the ovaries in white crepe paper. I didn’t fringe the ovaries on this piñata! For the fallopian tubes, I started out with long loops that drape gracefully over the ovaries — the fimbriae. Then, starting up near the fimbriae, I wrapped the tubes with more light pink, with the fringe pointing outwards towards the ovaries. It came out delicate and lacy looking!


For the very bottom of the piñata, I’ve sometimes painted it shiny pink to make it look like a cervix. For this version, instead I made rosettes with long streamers hanging down of dark red, white, and wax paper to symbolize the water breaking and some blood; then taped the entire thing onto the bottom. This made people laugh and sort of hold their heads in pain, so I consider it more successful than the shiny painted cervix technique.
Your uterus piñata is now basically done! Fill it with whatever you like! This one had : individually wrapped tea bags, tiny plastic bottles of vodka, chocolate candies, maxi pads, rainbow mardi gras beads, and a red feather boa for the placenta. The red feather boa was hilariously spectacular as the piñata started to break. “It’s… it’s like blood coming out?” I think everyone was afraid there would be an actual baby doll in there. Though I like gasping and swearing as reactions to my art, even I wouldn’t go so far. Unless it were a really, really, really gothy baby shower. It wasn’t! It was more like this kind:

But the frilly and jaunty piñata went pretty well!
To break a piñata I recommend you put on some music. Hang the piñata up where someone can swing it around at the other end of a rope. Blindfold people one by one and spin them around armed with a big wooden stick. Ideally there should be heckling and hooting sort of like a baseball game. Hey batter batter batter SWING.

Now you might think of this as perturbingly violent or promoting the idea of bashing someone’s body part with a baseball bat. However, try to adjust your mind to a different symbolism where cornucopia-like, abundant wealth flows freely out of a fertile, open uterus and you, as whackers with baseball bats, are encouraging it to open up to the world and deliver its fabulous contents!
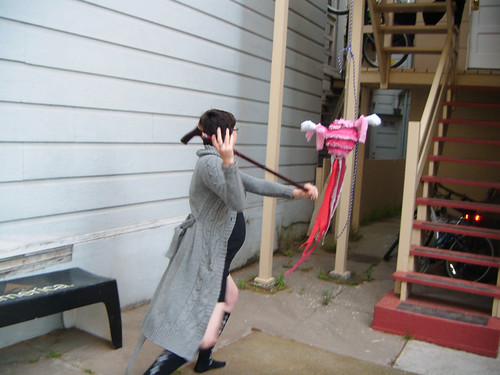
I forgot the stick and there wasn’t a good one around, so we used one of my walking canes.
Happy ridiculous uterus piñata party to you, if you do this!
53 Responses to How to make a uterus piñata